Use images instead of lists or buttons
|
Before you start What icons would you like to use? Which lists will be converted to icons? |
Why would I change to icons? Advantages include
|
|
Overview of process |
|
Step 1. Prepare your icons
-
Download icons from magic5 to see whether they suit your purposes. For example, the answers required below are simply 'yes' or 'no'. Radio buttons with the words "yes" and "no" could have been used but the icons are easier to identify and to touch with a finger. Both 'yes' and 'no' answers have an off-state that is a transparent circle with "Y" or "N" in it. When 'clicked' the icon changes to the on-state, showing a different colour for 'yes' or 'no'. This is a particularly popular scenario as, with suitably worded questions, desirable answers are shown in green and undesirable in red.
This requires 4 icons: on_yes.png, off_yes.png, on_no.png, off_no.png which are all available in the download.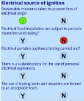
-
If magic5 icons are unsuitable, create your own using icon building software. This may be possible in Paint or Microsoft Word (using drawing tools or clipart) but remember to reduce the size to 48x48 pixels.
This example is not currently available in the download but gives an idea of what may be created. Again the off-state is transparent but this time both positive and negative on-states are coloured yellow. This is also effective as the eye is drawn to the coloured rather than non-coloured smiley but be sure that the positive and negative answers are always on the same side to avoid confusion when entering data or reading.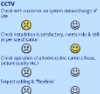
- Create two icons for each answer: an “on” icon for when the answer has been selected and an “off” icon for when it hasn’t.
- The “on” icon file needs to be called on_xxxx – ie. it needs to start with “on_”.
- The “off” icon is whatever the system finds that isn’t called on_xxxx but calling it off_xxxx is helpful for future reference.
Step 2. Associate the icons with the appropriate list and list entries
- In the menu Setup/Maintenance, select Lists. If you already have an appropriate list that you’re using in your templates you can make changes that to have the icons associated with each answer, otherwise you will need to start a new list.
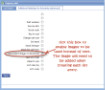
- Click on the list name, go to the “Additional attributes for list entries” tab and tick the box that says “Associated image or document” – this tells magic5 to display a prompt so that each list entry can have images associated with it. Save.
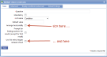
- Click on List entries and for each list entry (existing or added using the 'Add Item' button) go to the Additional attributes tab and click on “Add attachment”. This opens a browser where you can select the first of your image files (eg the 'off' version). Click the Add button to re-open the browser where you can select the second image file (eg the 'on' version). Save.

Step 3. Amend the template to use images instead of a 'normal' list or multiple choice
- Open the required template (Setup/Maintenance Menu->Maintain Templates->[your template name]).
- After amending the template the device will need to Receive Updates for these changes to be incorporated.
-
If you don't have a question set up already use the Add Item button and select Multiple choice from the menu. Select the required list and tick both boxes to "Arrange horizontally" and "Use list entry images instead of text".
- If you already have the question set up as a multiple-choice type, then click on the item within the template listing and follow the procedure above.
- If you already have the question set up and it’s a drop-down list type then:
- Click on the existing item and make a note of the unique name. Close the pop-up box.
- In the template item listing, right click on your drop-down list item and select delete.
- Add in a new multiple choice item (see previous box) giving it the same unique name as the item you’ve just deleted.
- Re-using the unique name protects historical data so these steps can be omitted if this is not required.
See Also